Sydney NSW, Australia 24×7 Available

DIY Magic: Create an Effective Homemade Carpet Cleaner That Works Wonders!

Keeping your carpets clean and fresh doesn’t have to involve expensive store-bought products or harsh chemicals. You can easily create an effective homemade carpet cleaner using simple ingredients that are eco-friendly and safe for your family. Whether you’re dealing with stubborn stains or everyday dirt, this DIY solution can work wonders on your carpets.

Homemade carpet cleaners are not only cost-effective but also free from harmful chemicals, making them a healthier alternative to traditional cleaning solutions. Here’s how to make and use an effective homemade carpet cleaner for all your carpet cleaning needs.

Why Go Homemade for Carpet Cleaning?

Using a homemade carpet cleaner offers several benefits:

  • Safe for Families and Pets: Many store-bought cleaners contain harsh chemicals that may be harmful. Homemade cleaners use natural ingredients, ensuring safety.
  • Budget-Friendly: Save money by using household items you likely already have in your pantry.
  • Environmentally Friendly: Reduce your ecological footprint by avoiding chemical-laden products.
  • Customizable: Adjust the ingredients to tackle specific stains or suit your carpet type.

Ingredients for a Homemade Carpet Cleaner

To create an effective homemade carpet cleaner, you’ll need these basic ingredients:

  1. White Vinegar: A natural disinfectant and stain remover.
  2. Baking Soda: Absorbs odors and helps lift dirt from carpet fibers.
  3. Dish Soap: Breaks down grease and grime.
  4. Hydrogen Peroxide: Effective for treating tough stains and sanitizing carpets.
  5. Essential Oils (optional): Adds a pleasant scent and additional antibacterial properties.
  6. Warm Water: Helps dilute the cleaning solution and enhances effectiveness.

These ingredients are non-toxic and safe to use on most carpets, making them ideal for regular cleaning and stain removal.

DIY Carpet Cleaner Recipes

Here are some easy recipes to create your own carpet cleaner at home:

1. All-Purpose Carpet Cleaner

  • 1 cup white vinegar
  • 2 cups warm water
  • 2 tablespoons dish soap
  • A few drops of your favorite essential oil (optional)
    How to Use: Mix all ingredients in a spray bottle. Spray the solution on the carpet, let it sit for 5 minutes, and blot with a clean cloth.

2. Deep Stain Remover

  • 1/4 cup hydrogen peroxide
  • 1 tablespoon dish soap
  • 1 cup warm water
    How to Use: Mix and apply the solution directly to the stain. Gently scrub with a brush, blot with a clean cloth, and rinse with water.

3. Odor Neutralizer

  • Baking soda
  • White vinegar
    How to Use: Sprinkle baking soda over the carpet and let it sit for 15-20 minutes. Spray vinegar on top and wait until it stops fizzing. Blot with a damp cloth and let it dry.

4. Foaming Carpet Cleaner

  • 1/4 cup liquid dish soap
  • 1/4 cup white vinegar
  • 1/4 cup warm water
    How to Use: Mix the ingredients in a bowl to create a foam. Apply it to stained areas, scrub gently, and wipe clean with a damp cloth.

Step-by-Step Guide to Cleaning Your Carpet

Follow these steps for effective DIY carpet cleaning:

  1. Vacuum First: Remove loose dirt and debris from the carpet to make the cleaning process more effective.
  2. Spot Test: Test your homemade cleaner on a small, inconspicuous area to ensure it doesn’t discolor or damage your carpet.
  3. Apply the Cleaner: Spray or apply the solution to the stained or dirty area.
  4. Scrub Gently: Use a soft-bristle brush to work the cleaner into the carpet fibers.
  5. Blot and Rinse: Blot the area with a clean, damp cloth to remove the solution and dirt.
  6. Dry Completely: Let the carpet air dry or use fans to speed up the process.

When to Call Professionals

While homemade carpet cleaners are great for regular maintenance and minor stains, some situations call for professional help. For deep cleaning or delicate carpets, consider hiring Eco-friendly Carpet Cleaning Services in Sydney. They use advanced equipment and environmentally friendly products to deliver a thorough clean.

Tips for Maintaining Clean Carpets

Regular maintenance is essential for keeping your carpets in top condition. Here are some tips:

  • Vacuum Frequently: Vacuum high-traffic areas at least twice a week to prevent dirt buildup.
  • Treat Spills Immediately: Address spills and stains as soon as they happen to prevent them from setting.
  • Use Door Mats: Place mats at entry points to reduce the amount of dirt and debris tracked onto your carpets.
  • Schedule Annual Cleaning: Consider deep cleaning your carpets once a year to maintain their freshness and longevity.

Conclusion

Creating a homemade carpet cleaner is an easy, cost-effective, and environmentally friendly way to keep your carpets clean and fresh. With natural ingredients like vinegar, baking soda, and dish soap, you can tackle stains and odors without relying on harsh chemicals. For more intensive cleaning needs, consider professional carpet cleaning services to ensure your carpets stay in perfect condition. By combining DIY solutions with regular maintenance, you can enjoy spotless and long-lasting carpets in your home.

Published on: February 15, 2025

A fabric couch is not only a cozy addition to your home but also a magnet for dirt, spills, and odors. Keeping your couch fresh and clean doesn’t have to involve harsh chemicals. With natural cleaning methods, you can maintain your couch’s beauty while protecting your family and the environment. This guide will show you how to perform effective couch cleaning using natural and eco-friendly techniques to keep your furniture spotless and inviting.

Why Go Natural for Couch Cleaning?

Choosing natural cleaning methods offers several benefits:

  • Safe for your family: No harsh chemicals means it’s safe for kids and pets.
  • Eco-friendly: Protects the environment from harmful residues.
  • Cost-effective: Uses affordable, everyday ingredients found in most homes.
  • Gentle on fabric: Prevents damage caused by abrasive or strong chemical cleaners.

Step-by-Step Guide to Naturally Clean Your Fabric Couch

1. Start with a Thorough Vacuum

Vacuuming removes loose dirt, dust, and crumbs that accumulate on your couch.

  • Use a vacuum cleaner with an upholstery attachment.
  • Focus on crevices, seams, and under cushions to eliminate hidden debris.
  • Regular vacuuming prevents dirt from embedding into the fabric.

2. Deodorize with Baking Soda

Baking soda is a natural deodorizer that absorbs unpleasant odors trapped in your couch.

  • Sprinkle a generous amount of baking soda evenly over the couch.
  • Let it sit for 15–20 minutes to work its magic.
  • Vacuum thoroughly to remove the baking soda, leaving your couch smelling fresh.

3. Spot Clean Stains Immediately

Tackling stains as soon as they happen prevents them from setting into the fabric.

  • Mix equal parts white vinegar and water in a spray bottle.
  • Test the solution on a hidden area of the couch to check for discoloration.
  • Lightly spray the stained area and blot with a clean microfiber cloth. Avoid rubbing, as this can spread the stain.
  • For tougher stains, create a paste with baking soda and water, apply it to the stain, and let it sit for 10–15 minutes before wiping clean.

4. Steam Clean for a Deep Clean

For a deeper natural clean, use a steam cleaner if the fabric allows it.

  • Check the couch’s care label for compatibility.
  • Steam cleaning not only cleans but also sanitizes by killing bacteria and allergens.
  • Let the couch air dry completely after steam cleaning.

5. Refresh with Essential Oils

Essential oils add a pleasant scent to your couch naturally.

  • Mix a few drops of your favorite essential oil (like lavender or lemon) with water in a spray bottle.
  • Lightly mist the couch for a refreshing aroma.
  • Avoid over-saturating the fabric.

Preventive Measures to Keep Your Couch Fresh

  1. Use Couch Covers
    Protect your couch with washable slipcovers or throws to minimize direct exposure to dirt and spills.
  2. Vacuum Weekly
    Regular vacuuming prevents the buildup of dirt and allergens, keeping your couch looking clean and fresh.
  3. Rotate Cushions
    Flipping and rotating cushions ensures even wear and prevents sagging in high-use areas.
  4. Establish Rules
    Minimize spills and stains by avoiding food and drinks on the couch.

Benefits of Natural Cleaning

  • Allergen Control: Reduces dust mites and allergens naturally.
  • Longer Couch Lifespan: Gentle cleaning preserves the fabric and prevents damage.
  • Healthier Home: Eliminates bacteria and odors without introducing harmful chemicals.

When to Call Professionals

For stubborn stains or heavy-duty cleaning, professional Deep Couch Cleaning Services Near Me can provide a thorough and safe solution. Professionals use advanced techniques and tools to restore your couch’s appearance while maintaining its integrity.

Common Natural Cleaning Mistakes to Avoid

  1. Skipping the Patch Test
    Always test cleaning solutions on an inconspicuous area to avoid discoloration or fabric damage.
  2. Over-Wetting the Fabric
    Excess moisture can lead to water stains or mold. Use minimal water and ensure proper drying.
  3. Using Colored Cloths
    Use white or light-colored cloths to avoid dye transfer onto your couch.
  4. Neglecting Regular Maintenance
    Irregular cleaning can make dirt and stains harder to remove over time. Establish a consistent cleaning routine.

Contact Us

Need professional help to keep your couch in top condition? Our expert couch cleaning services provide a natural and thorough clean for your furniture. Contact us today to learn more!

Conclusion

Keeping your fabric couch fresh and clean doesn’t have to involve harsh chemicals or costly products. With natural cleaning techniques, you can maintain a spotless and inviting piece of furniture that’s safe for your family and the environment. By following this step-by-step guide and practicing regular maintenance, your couch will stay fresh and comfortable for years to come.

Start your natural cleaning routine today and enjoy the benefits of a healthier, more eco-friendly home!

FAQs

Q1. Can I use vinegar on all fabric couches?

While vinegar is safe for most fabrics, always check the care label and test it on a hidden area first.

Q2. How often should I deep clean my couch?

Deep clean your couch every 6–12 months, depending on usage and exposure to dirt or allergens.

Q3. What’s the best way to remove pet hair naturally?

Use a lint roller, rubber gloves, or a vacuum with a brush attachment to effectively remove pet hair.

Q4. Can essential oils stain my couch?

If used sparingly and diluted with water, essential oils won’t stain your couch. Always mist lightly and avoid over-saturating the fabric.

Published on: February 13, 2025

Linen curtains are a timeless addition to any home, exuding elegance and a natural aesthetic that complements a variety of interior styles. While linen is known for its durability and beauty, it requires proper care to maintain its fresh and crisp appearance. Over time, dust, dirt, and even stains can accumulate, making regular cleaning essential.

Why Choose Linen Curtains?

Linen is a popular choice for curtains due to its breathable and lightweight nature. Here’s why homeowners love linen:

  1. Natural Elegance: Linen’s textured finish adds sophistication to any room.
  2. Durability: Linen is strong and can last for years with proper care.
  3. Eco-Friendly: Made from natural fibers, linen is a sustainable option for conscious homeowners.
  4. Temperature Regulation: Linen helps maintain a comfortable indoor climate, keeping your home cool in summer and warm in winter.

However, maintaining linen curtains requires special attention to preserve their unique qualities.

How Often Should You Clean Linen Curtains?

The frequency of cleaning depends on your environment and the exposure of your curtains to dust, smoke, or sunlight:

  • Weekly: Dust or vacuum your curtains to prevent buildup.
  • Seasonally: Wash or professionally clean your curtains every 3–6 months to remove deeper dirt and allergens.

Step-by-Step Guide to Cleaning Linen Curtains

1. Dust or Vacuum Regularly

Dust can settle on linen curtains, dulling their appearance and potentially causing allergies. Regular dusting keeps them fresh and prevents the need for frequent washing.

  • How to Do It:
    1. Close the curtains fully.
    2. Use a vacuum cleaner with a soft brush attachment to gently remove dust.
    3. Run the vacuum along the fabric from top to bottom on both sides.
  • Pro Tip: Dust your curtains weekly to minimize the need for deep cleaning.

2. Spot Clean Stains Immediately

Quick action is key when dealing with stains on linen curtains. The longer a stain sits, the harder it becomes to remove.

  • How to Spot Clean:
    1. Blot the stain gently with a clean, damp cloth to absorb any excess.
    2. Mix a mild detergent with warm water and dip a soft cloth into the solution.
    3. Dab the stained area without scrubbing to prevent damage to the fibers.
    4. Rinse with a damp cloth and let the area air dry.
  • Pro Tip: Test the cleaning solution on a small, hidden area of the curtain to ensure it doesn’t discolor the fabric.

3. Machine Washing

If your linen curtains are machine washable, follow these steps to clean them safely:

  1. Check the Care Label: Always read the care instructions to confirm if the fabric is machine washable.
  2. Use a Gentle Cycle: Wash the curtains in cold or lukewarm water on a delicate cycle.
  3. Choose a Mild Detergent: Opt for a detergent that’s free of harsh chemicals to protect the fibers.
  4. Avoid Overloading: Wash your curtains separately to allow proper cleaning and minimize wrinkling.
  • Pro Tip: Remove the curtains from the machine immediately after the cycle ends to prevent creases.

4. Hand Washing

For delicate or handmade linen curtains, hand washing is the safest option.

  • How to Hand Wash:
    1. Fill a basin with lukewarm water and add a small amount of mild detergent.
    2. Submerge the curtains and gently agitate them with your hands.
    3. Let them soak for 10–15 minutes before rinsing thoroughly with clean water.
    4. Squeeze out excess water without wringing to avoid stretching the fabric.

5. Drying Linen Curtains

Proper drying is essential to prevent shrinkage and maintain the shape of your linen curtains.

  • How to Dry:
    1. Hang the curtains to air dry in a well-ventilated area, away from direct sunlight.
    2. Use a drying rack or hang them back on the rod to let wrinkles fall out naturally.
  • Pro Tip: Avoid tumble drying, as high heat can cause shrinkage and damage to the fabric.

6. Ironing and Steaming

Linen naturally wrinkles, which adds to its charm, but if you prefer a crisper look, light ironing or steaming can help.

  • How to Do It:
    • Use a warm iron and press the fabric while it’s still slightly damp.
    • Alternatively, use a handheld steamer to smooth out wrinkles while the curtains hang.
  • Pro Tip: Always iron on the reverse side to protect the linen’s texture.

When to Seek Professional Help

If your linen curtains are heavily soiled or have stubborn stains, consider professional Curtain Cleaning services. Experts have the tools and experience to handle delicate fabrics safely and effectively. Look for trusted professionals offering Curtain Cleaning in Sydney to ensure your curtains receive the care they deserve.

Tips to Maintain Linen Curtains

  1. Rotate Curtains: Swap your curtains occasionally to ensure even exposure to sunlight, reducing fading.
  2. Use Curtain Liners: Liners protect your linen curtains from direct sunlight and dust, prolonging their lifespan.
  3. Control Humidity: High humidity can lead to mildew growth. Use a dehumidifier in damp areas to protect your curtains.
  4. Store Properly: If you need to store your curtains, fold them neatly and place them in a breathable fabric bag.

Benefits of Clean Linen Curtains

  • Enhanced Aesthetic Appeal: Fresh and clean curtains elevate the look of your space.
  • Healthier Living Environment: Regular cleaning removes dust, allergens, and bacteria, improving indoor air quality.
  • Prolonged Lifespan: Proper maintenance ensures your curtains stay in excellent condition for years.

Conclusion

Linen curtains add timeless elegance to your home, but they require the right care to maintain their beauty and functionality. By dusting regularly, addressing stains promptly, and washing them carefully, you can keep your linen curtains looking fresh and sophisticated. For heavily soiled or delicate curtains, professional Curtain Cleaning services are a reliable solution.

Follow these expert tips, and your linen curtains will remain a stunning feature of your home for years to come!

Published on: February 12, 2025

Floodwater might seem like just a rising tide of water, but beneath the surface lies a cocktail of unseen threats. Contaminated floodwater can carry bacteria, chemicals, and debris that pose serious health and safety risks. Understanding these dangers and acting quickly is critical to protecting your home and family. Professional Water Damage Restoration services are essential for safely handling and recovering from flood damage.

What Makes Floodwater Dangerous?

Floodwater is rarely just water. It can become a hazardous mix of:

  • Pathogens: Bacteria, viruses, and parasites that cause diseases.
  • Chemical Contaminants: Oil, gasoline, pesticides, and industrial chemicals.
  • Sewage: Overflowing sewage systems can release human waste into floodwater.
  • Debris: Sharp objects, glass, and other hazards carried by water currents.
  • Mold Spores: Flooding creates the perfect environment for mold growth, which can spread rapidly.

These hidden dangers make it crucial to treat floodwater with caution and take immediate steps to clean and restore affected areas.

The Health Risks of Floodwater Contamination

1. Waterborne Diseases

Floodwater often contains harmful bacteria such as E. coli, Salmonella, and Leptospira, which can cause gastrointestinal illnesses, fever, and infections.

2. Skin and Eye Irritations

Direct contact with contaminated water can lead to skin rashes, irritations, and eye infections.

3. Respiratory Issues

Inhalation of mold spores and other airborne contaminants can cause respiratory problems, particularly for individuals with asthma or weakened immune systems.

4. Chemical Poisoning

Floodwater can carry industrial chemicals and pesticides, which can cause poisoning if ingested or absorbed through the skin.

5. Injuries from Debris

Sharp objects and hidden debris in floodwater can cause cuts, bruises, and puncture wounds, increasing the risk of infections.

Steps to Protect Your Home from Floodwater Contamination

1. Avoid Direct Contact

Never wade through floodwater unless absolutely necessary. Wear waterproof gloves, boots, and protective clothing if contact is unavoidable.

2. Turn Off Utilities

If your home is flooded, turn off electricity, gas, and water to prevent electrical shocks and further contamination.

3. Remove Standing Water Promptly

Use pumps and wet vacuums to extract standing water quickly. Standing water is a breeding ground for bacteria and mold.

4. Clean and Disinfect Thoroughly

Wash all affected surfaces with water and detergent, then disinfect with a bleach solution. Focus on areas prone to moisture retention, such as basements and bathrooms.

5. Dry the Area Completely

Use industrial fans and dehumidifiers to ensure complete drying. Moisture left behind can lead to mold growth and further contamination.

6. Dispose of Contaminated Items

Discard porous materials like carpets, mattresses, and upholstered furniture that have been saturated with floodwater.

7. Hire Professional Help

For extensive contamination, call a professional Damage Restoration service. Experts can safely clean, disinfect, and restore your home while preventing hidden risks.

How Water Damage Restoration Helps

Professional Damage Restoration services provide comprehensive solutions to address floodwater contamination, including:

  • Water Extraction: Removing all standing water and preventing further contamination.
  • Cleaning and Sanitizing: Thoroughly disinfecting affected areas and surfaces.
  • Mold Remediation: Treating and removing mold to ensure a healthy living environment.
  • Restoration: Repairing and replacing damaged materials to restore your home.

By addressing the hidden dangers of floodwater contamination, professionals ensure your home is safe, clean, and habitable.

Contact Us

If your home has been affected by floodwater contamination, don’t take risks. Our experienced team specializes in Water Damage Restoration in Sydney to ensure your property is cleaned, disinfected, and restored safely. Contact us today for a consultation and let us help you reclaim your home.

FAQs About Floodwater Contamination

Q1: How soon should I start cleaning after a flood?

Begin cleaning within 24-48 hours to prevent mold growth and reduce contamination risks.

Q2: Can I clean floodwater contamination myself

For minor issues, DIY cleaning is possible with proper precautions. However, extensive contamination requires professional Restoration.

Q3: What items should I discard after floodwater exposure?

Discard porous materials like carpets, upholstered furniture, and mattresses. Non-porous items like metal or glass can often be disinfected and saved.

Q4: Is floodwater contamination covered by insurance?

Coverage depends on your policy. Check with your insurance provider to understand what is included.

Published on: February 11, 2025

Accidents happen, whether it’s a baby’s diaper mishap, a pet’s surprise, or an unfortunate illness. While the thought of cleaning poop from a mattress might feel overwhelming, don’t panic! With the right approach and tools, you can clean and sanitize your mattress effectively without leaving behind stains or odors.

Why Clean Your Mattress Thoroughly?

Cleaning poop from a mattress promptly is crucial not only to avoid stains and odors but also to eliminate harmful bacteria. Regular Mattress Cleaning ensures a healthier sleeping environment, prevents the buildup of allergens, and prolongs the life of your mattress.

11 Stress-Free Steps to Clean Poop from Your Mattress

1. Act Quickly

Time is of the essence when it comes to cleaning up poop from a mattress. The sooner you act, the easier it will be to remove stains and prevent odors from setting in.

2. Remove Bedding

Carefully remove all bedding, including sheets, mattress protectors, and blankets. Avoid spreading the mess further. Place the soiled items in a laundry basket to prevent contamination and wash them immediately in hot water with a strong detergent.

3. Scrape Off Excess Poop

Using a disposable spatula, paper towel, or gloves, gently remove as much solid waste as possible. Be careful not to push it deeper into the mattress. Dispose of the waste in a plastic bag and seal it tightly before discarding.

4. Blot the Affected Area

Use a clean cloth or paper towel to blot the stained area and absorb any remaining moisture. Do not rub, as this can spread the stain and embed it further into the fabric.

5. Prepare a Cleaning Solution

Mix a cleaning solution using one of the following options:

  • 1 cup of warm water with a few drops of mild detergent.
  • A natural solution of equal parts white vinegar and water.
  • Enzyme-based cleaners designed to break down organic matter like poop.

6. Apply the Solution

Dampen a clean cloth with the cleaning solution and gently blot the stained area. Avoid soaking the mattress, as excess moisture can lead to mold growth. Work from the outside of the stain inward to contain it.

7. Rinse the Area

Using a damp cloth and clean water, rinse away any soap or cleaning solution residue. Thorough rinsing ensures that no residue is left behind, which could attract dirt or cause discoloration over time.

8. Deodorize with Baking Soda

Sprinkle baking soda generously over the cleaned area to neutralize odors and absorb any remaining moisture. Allow it to sit for several hours or overnight for maximum effectiveness.

9. Vacuum Thoroughly

Once the baking soda has done its job, use a vacuum cleaner with an upholstery attachment to remove all the powder. This step leaves your mattress clean, fresh, and odor-free.

10. Air Dry the Mattress

Let the mattress dry completely before placing any bedding back on it. Position it near an open window or use a fan to speed up the drying process. Proper drying prevents mold and mildew from developing.

11. Protect Your Mattress

To avoid future mishaps, invest in a waterproof mattress protector. These protectors shield your mattress from spills, stains, and accidents, making cleaning easier the next time around.

When to Call Professionals

If the stain or odor persists despite your best efforts, professional help may be necessary. Search for Stain Removal for Mattresses Near Me to find local experts who specialize in deep cleaning and stain removal. Professional services can restore your mattress to its original condition, ensuring it’s safe and comfortable for use.

Tips for Maintaining a Clean Mattress

  1. Use a Mattress Protector: A waterproof and washable protector keeps your mattress safe from spills and accidents.
  2. Vacuum Regularly: Vacuuming once a month prevents dust and allergens from settling in.
  3. Spot Clean Immediately: Address any spills or stains as soon as they happen to prevent permanent damage.
  4. Wash Bedding Weekly: Clean sheets and covers regularly to maintain a hygienic sleeping environment.

Benefits of Regular Mattress Cleaning

  • Healthier Sleep Environment: Regular cleaning eliminates allergens, bacteria, and odors, promoting better sleep.
  • Prolonged Mattress Life: Proper care prevents wear and tear, extending the lifespan of your mattress.
  • Improved Comfort: A clean mattress ensures a fresh, inviting sleep surface.

Conclusion

Accidents on a mattress might seem like a nightmare, but with these 11 easy steps, you can handle them stress-free. Quick action, the right cleaning solutions, and proper drying are key to keeping your mattress clean, fresh, and free of stains or odors. And if you’re ever in doubt, professional Mattress Cleaning services are just a call away. With regular maintenance and a little care, you can ensure your mattress remains a comfortable and hygienic haven for years to come.

Published on: February 10, 2025

Sheepskin rugs are a luxurious and cozy addition to any home, offering unmatched softness and warmth. However, their delicate fibers and natural composition require special care to keep them looking and feeling their best. Whether your rug is a small accent piece or a centerpiece in your living room, knowing how to clean it properly is key to preserving its beauty and longevity.

In this guide, we’ll share simple yet effective tips for cleaning and maintaining your sheepskin rug. From routine care to tackling tough stains, these expert-approved methods will ensure your rug stays fluffy, fresh, and fabulous.

Why Sheepskin Rugs Need Special Care

Sheepskin rugs are made from natural wool fibers attached to a leather or suede backing. Unlike synthetic rugs, they require gentle handling to prevent damage. Their fibers are naturally dirt-repellent, but over time, they can accumulate dust, stains, and odors. Regular cleaning helps preserve the rug’s softness, shine, and durability.

Step-by-Step Guide to Cleaning a Sheepskin Rug

Here’s how you can clean your sheepskin rug at home without compromising its quality:

1. Shake Out Loose Dirt and Debris

The first step to cleaning your sheepskin rug is removing surface dirt.

  • Take the rug outside and give it a good shake.
  • Gently brush the fibers with a sheepskin brush to loosen any trapped dirt or dust.

This simple step helps maintain the rug’s fluffiness and prevents dirt from settling deeper into the fibers.

2. Vacuum Carefully

Vacuuming your sheepskin rug is an excellent way to remove embedded dirt.

  • Use the upholstery attachment on your vacuum cleaner.
  • Set the vacuum to low suction to avoid damaging the fibers.
  • Gently vacuum in the direction of the wool to prevent pulling.

Regular vacuuming helps keep your rug clean between washes.

3. Spot Clean Stains Immediately

If your rug has a spill or stain, act quickly to prevent it from setting.

  • Blot the Spill: Use a clean, dry cloth or paper towel to absorb the liquid. Do not rub, as this can spread the stain.
  • Use a Mild Detergent: Mix a small amount of wool-safe detergent with lukewarm water. Dip a soft cloth into the solution and gently dab the stain.
  • Rinse and Dry: Wipe away the soap with a damp cloth and blot dry with a towel.

For tougher stains, professional services offering same day rug cleaning can provide expert assistance.

4. Hand Wash for a Deep Clean

If your rug needs a thorough cleaning, hand washing is the safest method.

  • What You’ll Need: Wool-safe detergent, a large tub or sink, and lukewarm water.
  • Steps:
    1. Fill the tub or sink with lukewarm water and add a small amount of detergent.
    2. Submerge the rug, gently swishing it around to clean the fibers.
    3. Avoid scrubbing or wringing the rug, as this can damage the leather backing.
    4. Rinse thoroughly with clean water to remove all detergent.

5. Dry Properly

Proper drying is crucial to maintaining the shape and softness of your sheepskin rug.

  • Lay the rug flat on a clean towel in a well-ventilated area.
  • Avoid direct sunlight or heat sources, as they can shrink or harden the leather backing.
  • Once dry, fluff the fibers with a sheepskin brush to restore their softness.

Additional Tips for Sheepskin Rug Care

  1. Avoid Harsh Chemicals: Always use wool-safe detergents and avoid bleach or strong cleaning agents.
  2. Rotate the Rug: Rotate your rug periodically to ensure even wear, especially in high-traffic areas.
  3. Protect from Moisture: Sheepskin rugs are not water-resistant. Keep them away from damp areas to prevent mold and mildew.

When to Call the Professionals

While regular maintenance works wonders, there are times when professional cleaning is the best option:

  • For large or heavily soiled rugs.
  • When dealing with tough stains or odors.
  • To ensure delicate care for high-quality or antique sheepskin rugs.

Professional services offering same day rug cleaning near me can provide quick and effective cleaning, saving you time and effort while ensuring your rug stays in pristine condition.

Common Mistakes to Avoid

  1. Using Hot Water: Hot water can cause the leather backing to shrink and the fibers to lose their softness.
  2. Over-Wetting: Excess water can damage the rug’s structure and take a long time to dry.
  3. Skipping Regular Maintenance: Neglecting routine care can lead to dirt buildup and reduce the rug’s lifespan.

By avoiding these mistakes, you can keep your sheepskin rug in top shape for years.

Benefits of Regular Sheepskin Rug Care

  • Preserves Softness: Regular cleaning keeps the fibers fluffy and comfortable.
  • Enhances Longevity: Proper maintenance prevents wear and tear, ensuring your rug lasts longer.
  • Improves Aesthetics: Clean and well-maintained rugs enhance the overall look of your space.

Conclusion

Cleaning a sheepskin rug doesn’t have to be complicated. By following these simple steps—shaking, vacuuming, spot cleaning, hand washing, and proper drying—you can keep your rug looking fresh and luxurious. Regular maintenance not only saves you time and money but also preserves the rug’s softness and beauty.

For stubborn stains or deep cleaning needs, professional services like same day rug cleaning are the perfect solution. With expert care, your sheepskin rug will continue to be a stylish and cozy addition to your home for years to come.

Published on: February 8, 2025

A hole in your wool carpet can be frustrating, especially if it’s in a visible area. Instead of replacing the entire carpet, you can repair it yourself with the right tools and techniques. Fixing a hole in wool carpet requires patience and precision, but it can save you money while restoring your carpet’s look. Follow these step-by-step instructions to patch up the hole and make your carpet look as good as new.

Tools and Materials Needed

Before you begin, gather the following supplies:

  • A matching carpet piece (from a leftover roll or an inconspicuous area like under furniture)
  • Carpet adhesive or double-sided carpet tape
  • Utility knife or carpet cutter
  • Scissors
  • Ruler or measuring tape
  • Carpet roller or heavy object for securing the patch

Step 1: Assess the Damage

Examine the size and depth of the hole. If it’s small, you might be able to repair it with simple stitching. However, if the damage is larger, a patch will be the best solution. Make sure the replacement piece closely matches the texture and pattern of your existing carpet.

Step 2: Cut Out the Damaged Section

Using a utility knife, carefully cut out the damaged portion of the carpet in a neat, square shape. Avoid jagged edges, as they can make the patching process more difficult. Use a ruler to ensure straight lines.

Step 3: Prepare the Replacement Patch

Find a matching piece of wool carpet that fits the cut-out section. If you don’t have extra carpet, consider taking a small piece from an area that won’t be noticeable, such as inside a closet. Cut the replacement piece to match the exact dimensions of the removed section.

Step 4: Attach the Patch

Place double-sided carpet tape or carpet adhesive on the floor where the hole was removed. Carefully position the replacement patch into the opening, ensuring the fibers align with the surrounding carpet. Press down firmly to secure it in place.

Step 5: Blend the Patch with the Carpet

Use a carpet roller or a heavy object to press the patch down, ensuring it adheres properly. Gently blend the edges by running your fingers or a brush over the fibers to make the patch less noticeable.

Step 6: Allow the Patch to Set

Let the adhesive dry completely before walking on the repaired area. This process can take a few hours, depending on the type of glue used. Avoid heavy foot traffic until the patch is fully secure.

Step 7: Clean and Fluff the Carpet

Once the patch is set, vacuum the area to blend the fibers and remove any excess debris. If needed, consider carpet cleaning to refresh the entire area and make the repair even less noticeable.

When to Call a Professional

If the hole is too large or if the patching process seems overwhelming, professional help may be the best option. Experts in Carpet Patching Services in Sydney can ensure a seamless repair, making the fix nearly invisible.

Conclusion

Fixing a hole in a wool carpet is a cost-effective way to restore its appearance without replacing the entire flooring. With the right tools and techniques, you can repair minor damage yourself. However, if the damage is extensive, professional assistance can provide the best results.

Published on: January 29, 2025

Carpet deodorisers are often seen as quick fixes for unpleasant odours in carpets. While they can temporarily mask smells, they don’t address the underlying issues causing the odours. For long-lasting freshness and a truly clean carpet, professional carpet cleaning is a far more effective solution. In this article, we’ll explain why carpet deodorisers fall short, how they work, and why proper cleaning is essential for odour removal.

1. How Carpet Deodorisers Work

Carpet deodorisers typically come in the form of powders, sprays, or foams. They’re designed to:

  • Mask odours with a pleasant scent.
  • Absorb some surface-level moisture and odour particles.

While they may leave your carpet smelling fresh temporarily, deodorisers don’t penetrate deep into the fibres to eliminate odour-causing bacteria, mould, or other contaminants.

2. Why Carpet Deodorisers Aren’t Enough

a. Temporary Solution

Carpet deodorisers work by covering up odours, not removing them. The scent fades over time, and the underlying cause of the smell—such as pet urine, food spills, or mould—remains.

b. Surface-Level Effect

Deodorisers address only the surface of the carpet. Odour-causing substances embedded deep within the fibres or padding require thorough cleaning to be eliminated.

c. Residue Build-Up

Powdered deodorisers can leave residue in your carpet, which may attract dirt and make your carpet appear dirty more quickly. Over time, this residue can also contribute to a musty smell.

d. Ineffective Against Persistent Odours

Odours caused by pet accidents, mildew, or bacteria are often resistant to deodorisers. Without removing the source, the smell will continue to linger.

3. The Importance of Professional Carpet Cleaning for Odour Removal

To truly eliminate odours, it’s essential to address the root cause. Professional carpet cleaning goes beyond masking smells and provides a deep clean that restores your carpet’s freshness.

Benefits of Professional Cleaning:

  • Deep Penetration: Professional cleaning methods, such as steam cleaning, remove dirt, bacteria, and odour-causing particles embedded deep within the carpet fibres.
  • Odour Neutralisation: High-quality cleaning solutions neutralise odours at the source, leaving your carpet fresh and hygienic.
  • Mould and Bacteria Removal: Steam cleaning kills mould spores and bacteria that can cause persistent smells.
  • Eco-Friendly Solutions: Many professional cleaners use non-toxic, eco-friendly products that are safe for your family and pets.

4. Common Causes of Carpet Odours

Understanding what causes odours in your carpet can help you address the issue more effectively. Common culprits include:

  • Pet Urine: Pet accidents can seep into the carpet padding, causing lingering odours if not treated promptly.
  • Spills and Stains: Food and drink spills can leave behind unpleasant smells, especially if not cleaned thoroughly.
  • Moisture and Mould: Damp carpets create an ideal environment for mould and mildew, which can emit a musty odour.
  • Bacteria Build-Up: Over time, dirt and debris can harbour bacteria, leading to unpleasant smells.

5. When to Call a Professional Carpet Cleaner

If your carpet has persistent odours that don’t go away despite regular vacuuming or using deodorisers, it’s time to call in the professionals. Signs you need professional cleaning include:

  • Lingering smells after cleaning or deodorising.
  • Visible stains or discolouration.
  • Allergy symptoms, such as sneezing or respiratory discomfort, that worsen when at home.
  • A damp or musty smell, indicating possible mould.

6. Maintaining Fresh Carpets Between Professional Cleans

While professional cleaning is the best solution for odour removal, regular maintenance can help keep your carpets fresh between deep cleans:

  • Vacuum Regularly: Vacuum high-traffic areas at least twice a week to remove dirt and debris.
  • Spot Clean Spills Immediately: Address spills promptly to prevent them from seeping into the carpet fibres and causing odours.
  • Improve Ventilation: Open windows or use fans to improve airflow and reduce moisture in your home.
  • Use Rugs and Mats: Place mats in high-traffic areas to minimise dirt and spills on your carpet.

Contact Us for Professional service

At Bt Carpet Cleaning Sydney, we are the Top-rated carpet cleaners that eliminates odours and restores your carpet’s freshness. Our experienced technicians use advanced equipment and eco-friendly solutions to tackle even the toughest smells.

Contact us today to schedule your appointment and enjoy a cleaner, healthier home!

Conclusion

Carpet deodorisers may provide a temporary fix for unpleasant smells, but they don’t address the root cause of odours. Professional carpet cleaning is the most effective way to eliminate odours, remove bacteria, and restore your carpet’s freshness. By maintaining regular cleaning habits and scheduling professional services, you can enjoy clean, odour-free carpets and a healthier home environment.

FAQs About Carpet Odours and Cleaning

1. Why doesn’t carpet deodoriser remove odours permanently?

Carpet deodorisers only mask odours temporarily and don’t remove the underlying cause, such as bacteria, mould, or embedded dirt.

2. Can professional carpet cleaning remove pet odours?

Yes, professional cleaning effectively removes pet odours by treating the source, including deep-set urine and bacteria.

3. How often should I have my carpets professionally cleaned?

It’s recommended to clean carpets professionally every 12–18 months, or more frequently for high-traffic homes or those with pets.

Published on: January 28, 2025

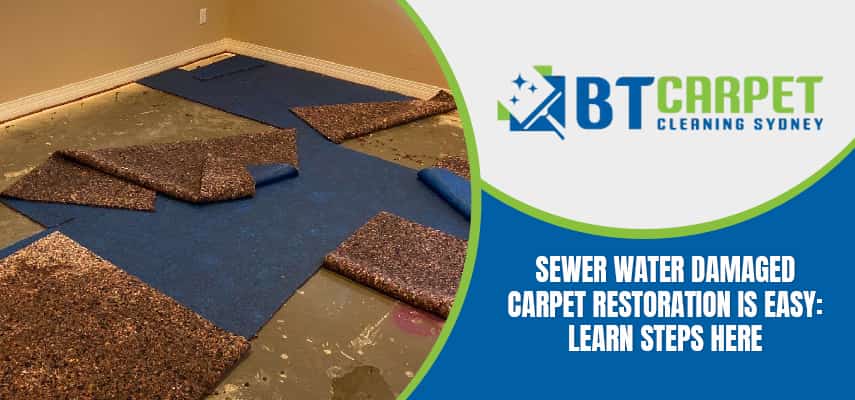
Sewer water damage has become a common problem that people face several times. It usually happens because of toilet backflow, or drain backup. The main reason behind sewer water damage is the overflow of water in the sewer and broken pipelines which leads to the accumulation of dirty and stinky water inside our homes in various areas including bedrooms, living rooms and kitchens. Sewer water damage in home damage the carpets completely because carpets are always placed on the ground and water reaches them quickly. And carpet fibres absorb water quickly. It can lead to a huge predicament if not treated the problem on time therefore, taking help from a Flood Damage Restoration Sydney service becomes absolutely necessary.

sewer water damaged carpet restoration service

Here are The Tips to Restore The Sewer Water Damaged Carpets

  • The initial and most important step that you need to take is by repairing the broken pipes. If you do not do it at first then the overflow of water will not stop and the water will reach the entire house and make the problem worse.
  • Later you have to remove the damaged carpet and pack it into a sealed bag and keep it outside your house because a damaged carpet can cause many health problems too.
  • After the sewer water damage carpet paddings must get destroyed. Therefore, asking for suggestions from experts would be a safe idea.
  • While doing these things make sure you are wearing gloves, masks and goggles because direct touch with the dirty carpets can lead to skin infections. 
  • If the carpet is damaged for more than 70 hours then you will have to replace it. Because after 70 hours moulds grow on carpet quickly. 
  • The best option left in these situations is to call a reliable and professional carpet water damage restoration service provider because they can handle the situation easily with the application of efficient tools which people usually do not have in their homes.

Where to Seek Help

Welcome to BT Carpet Cleaning Sydney this is a place where you can get the best solutions if you have water-damaged carpets inside your house. We have a team of professionals who have been toiling in this industry for more than 2 decades. Our technicians are experienced and have all the required tools to repair all types of damaged carpets perfectly. You can avail of our Flood Damage Restoration Sydney at affordable costs. We provide same day booking services too. So get in touch with us now for more best offers.

Published on: December 9, 2022

Last updated on: December 10, 2022

We Are Kings Langley’s Leading Carpet Cleaning Professionals

With nationwide coverage, Carpet Cleaning Kings Langley is a leading carpet cleaning business in Australia. For utmost customer satisfaction, we at Carpet Cleaning, use the finest and the most powerful equipment. Our technicians are fully trained and certified in various carpet cleaning services.

Steam Carpet Cleaning Kings Langley

We know every carpet cleaning situation is unique. Steam carpet cleaning is the most common method used for both carpets and upholstery cleaning. We dry, clean and sanitize the inanimate surfaces, ground-in dirt and debris that may or may not be visible to the naked eye.

Leather Sofa Cleaning

With the ultimate leather sofa cleaning services by Carpet Cleaning, you can get your sofa cleaned safely and effectively. We understand the fact that leather is a superb investment and adds a touch of class. With our services you can restore its natural shine and vibrancy.

Dry Carpet Cleaning

We use specialized machines to clean carpets with recently developed chemical technologies. This results in not only removal of stains, debris, sand and allergens but also in carpet beautification. We help you keep your carpet visually pleasing, healthier and potentially longer-lasting.

Why Choose Us?

We are certified and professional technicians. Firstly, we analyze your carpet completely and note down all the heavily-spoiled or high-traffic areas. Further, our carpet cleaning specialists use the method required, accordingly. We know whether to dry clean or steam clean. The varied services that we provide turn us a reputable carpet cleaning service provider. We have built an unbeatable customer base with satisfied clients through our best carpet cleaning, fabric and leather sofa cleaning, tile and grout cleaning, mattress cleaning, water damage restoration, per stain services general cleaning services and more. The top quality results come along with impeccable customer services. Contact us today.

View Our Top Quality Cleaning Results

We take on every cleaning project with a sheer objective of completing the work with top quality results.

Feast you eyes with our previous work shown ahead and decide yourself.

    Call to our Experts 02 5701 5386

    See What Our Happy Clients Have To Say

    ” Thank you once again for doing a great job. The horrible stains including the stains of red wines are now gone and credit goes to you. Our restaurant’s carpet looks no less than a new one. We’ll certainly pass on your contact for our hotel’s carpet cleaning requirements. “

    Mark Anthony

    ” The team has done a fabulous job cleaning our carpets. Every technician was professional and did the job with consistency and perfection. Thank you so much! “

    Christina Hardy

    ” Carpet cleaning is hard. Ours had become a mess to say the least. The carpets now, however, are good as new. Thanks to the team! “

    Jane Bennett

    ” Your company never fails to deliver the best carpet cleaning services. I am amazed how you make it look so easy, even when it is not. Excellent work! Thank you! “

    Jessica Lee
     Our Happy Clients Have To Sa

    Published on: August 25, 2022